The devices running Lineage OS now receive weekly OTA updates whereas, in the start, it was set on nightly updates. The Lineage OS supports upgrades to older devices where the OEM has stopped the official support for those devices. The latest LineageOS version is 19 with Android version 12.1 Snow Cone.
Warning and Backup
You may flash Lineage OS on a device or a phone at your own risk. Even if you follow this article to the letter, we can’t guarantee that your device will not break and we do not take any responsibility if your device or phone breaks or is bricked. This article is for educational purposes only and we have tried our best to include the best/safest methods for the installation process but we cannot offer any type of guarantee of success. Also, flashing Lineage OS on a device or phone may void the phone’s warranty, so, advance at your own risk as Appuals.com will not be responsible for any issues during or after flashing Lineage OS on your device or phone. Moreover, installing or flashing Lineage OS on your device will wipe all the data on your phone, so, make sure to back up the phone’s data. Additionally, if you want to play safe, you can back up the phone’s stock ROM (the Internet is your best friend) to reflash it later if the Lineage OS did not meet your requirements.
Requirements to Install Lineage OS
There are some requirements to complete the installation of the Lineage OS on your phone or device:
Step 1: Check Your Device Compatibility
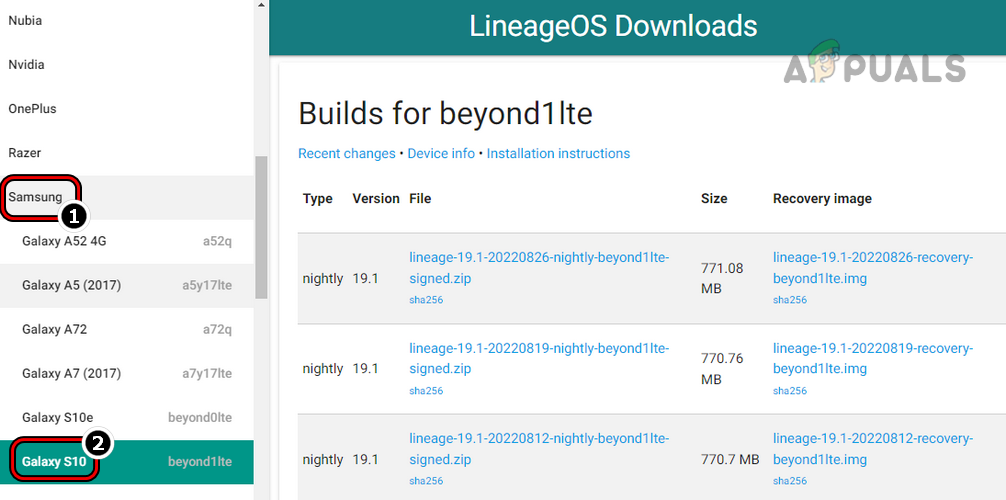
Enough of theory, let us move to flash Lineage OS on your device. The first step should be to check if your device is compatible with the Lineage OS and if your device’s custom ROM based on the Lineage OS is available. If your device is not shown on the downloads page of the Lineage website, then sorry to say you cannot install Lineage OS on your device (although you can use unofficial versions of the Lineage OS, we strongly recommend against them) and you may try another Android distro.
Step 2: Set Up PC and Device for Flashing
So, let us set up the PC and device for flashing.
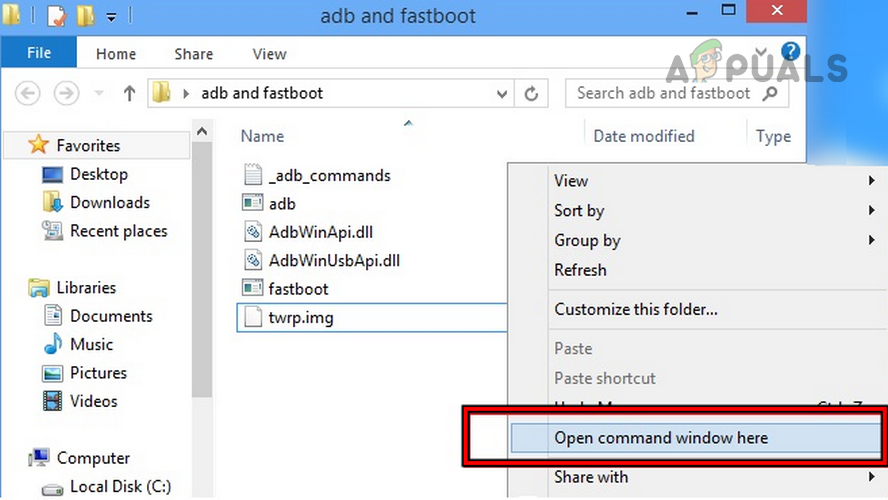
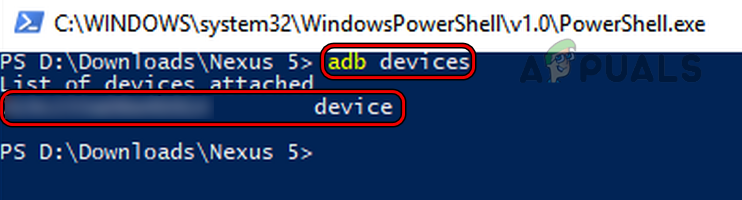
Download and Install ADB with Fastboot
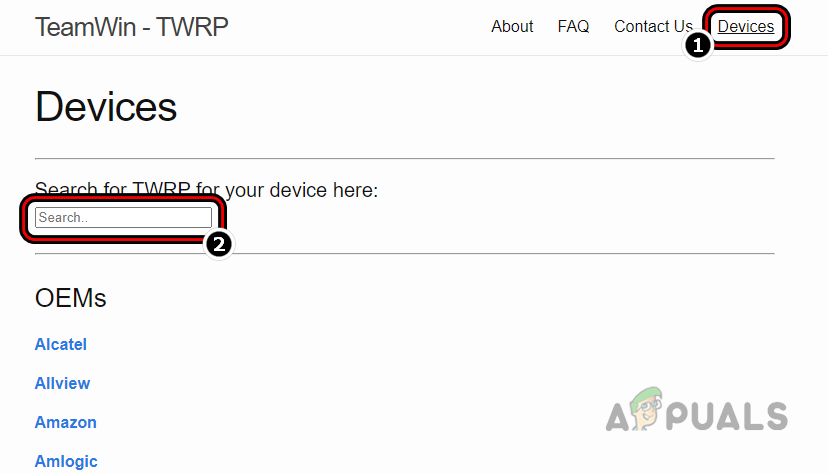
Download TWRP (Team Win Recovery Project)
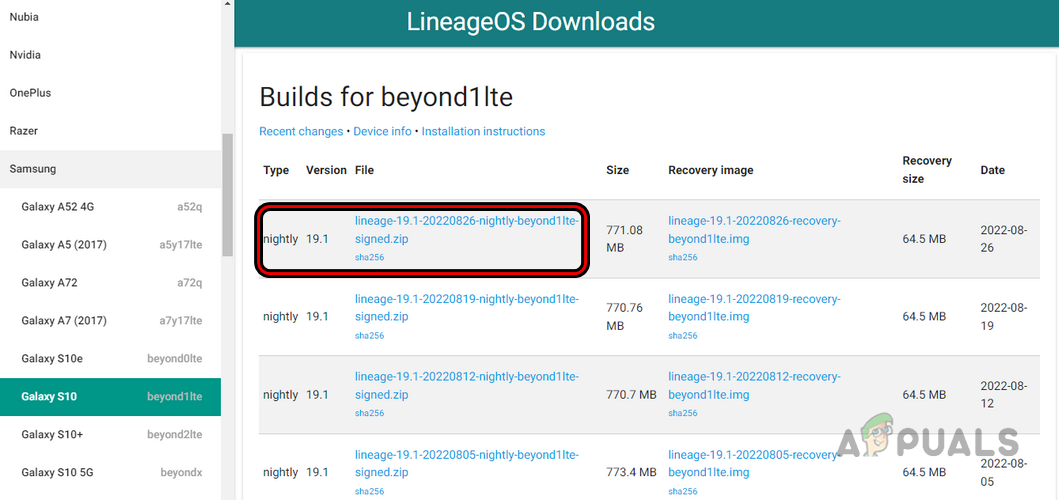
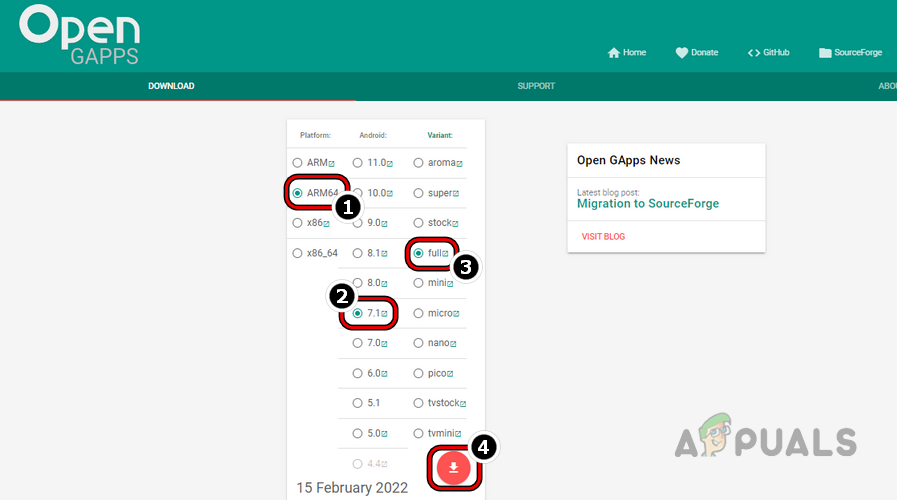
Download the Lineage OS
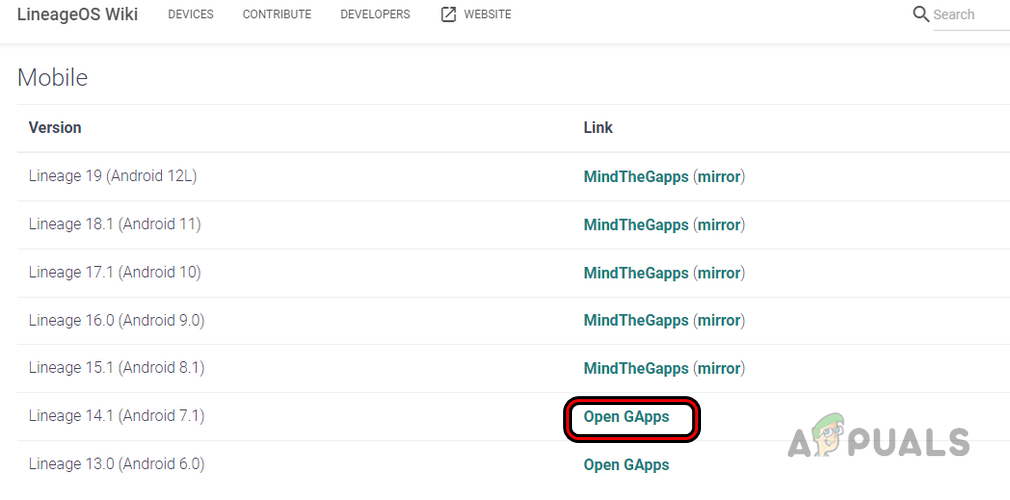
Download Google Apps (Optional Download)
To use your phone with your Google account, you will need to access the Play Store and all other Google features but that is not natively available on the Lineage OS (being an open source project). For that, you may install Google Apps. If you have planned not to use any Google-based Android features, then you can skip Google Apps.
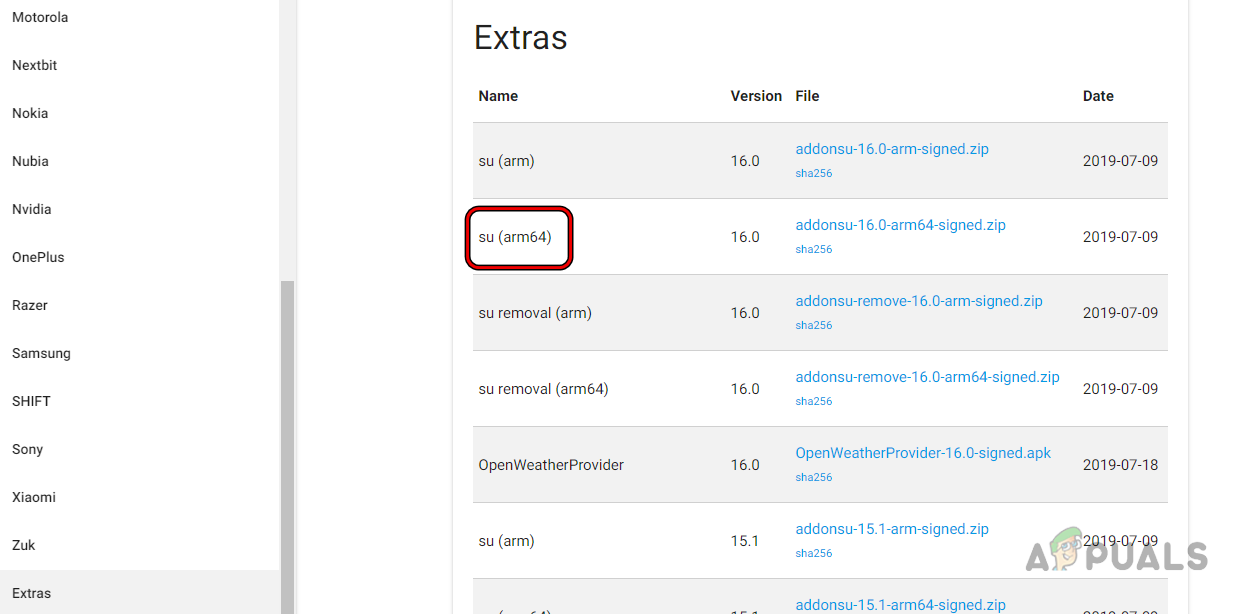
Download SU (Optional Download)
If you want to enable root access on your device after flashing Lineage OS on the device, then you may download SU. If you are not willing to enable root access on the phone, then you can skip the SU download. For some models, you may have to use the Magisk app to enable root access. Then move all these downloaded packages to the ADB folder, usually, the following location on a Windows PC:
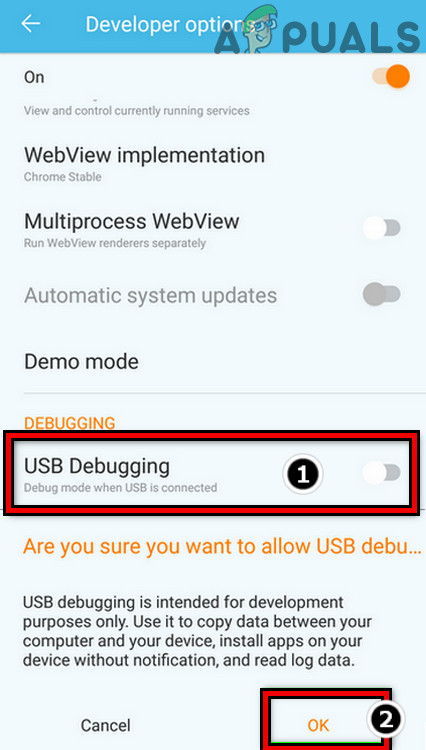
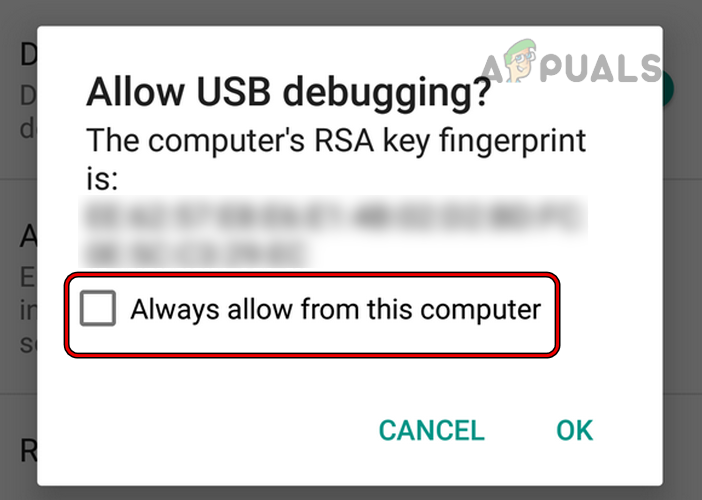
Enable Developer Mode and USB Debugging on Your Phone
To flash the Lineage OS on a phone, we need developer access and USB debugging on the phone as these features are essential to enable write access to the system ROM.
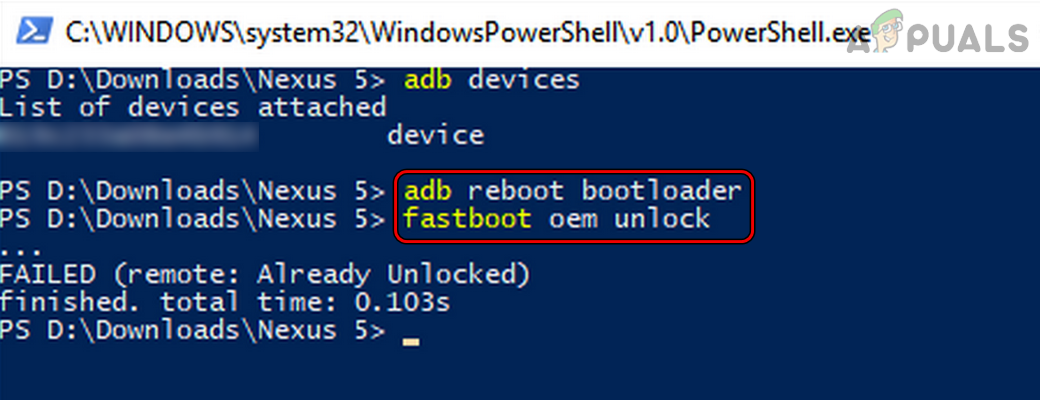
Step 3: Unlock the Bootloader of Your Phone
The first practical step in flashing Lineage OS on your Android phone is to unlock your phone’s bootloader. If you still have not backed up the phone, then make sure to back up your phone’s data as it will be wiped in the coming steps. Also, not every OEM permits unlocking on its bootloader, so, you may have to dig deeper by searching the forums on the Internet to unlock the bootloader of your particular device. If you fail to unlock your phone’s bootloader as your OEM does not support the ADB command to unlock the phone’s bootloader, then you may search the Internet to find out the method to unlock your phone’s bootloader.
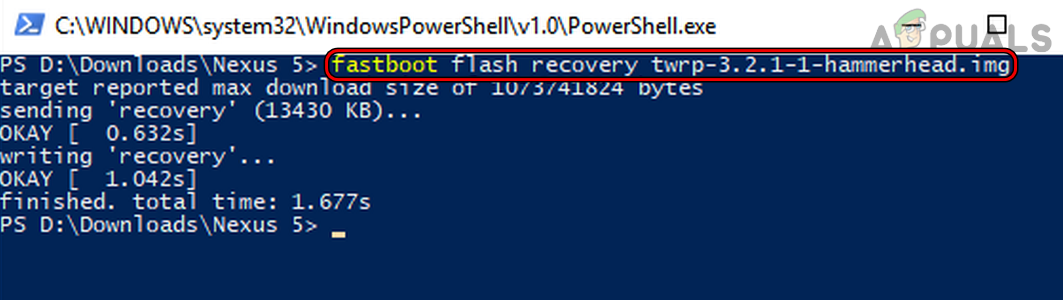
Step 4: Flash TWRP on Your Phone
After unlocking your phone’s bootloader, it is time to flash a custom recovery (like TWRP) on your phone. If you are not comfortable with the TWRP recovery, you can also use the recovery image from your phone’s download page on the Lineage website or you may use Clock Work Mode Recovery.
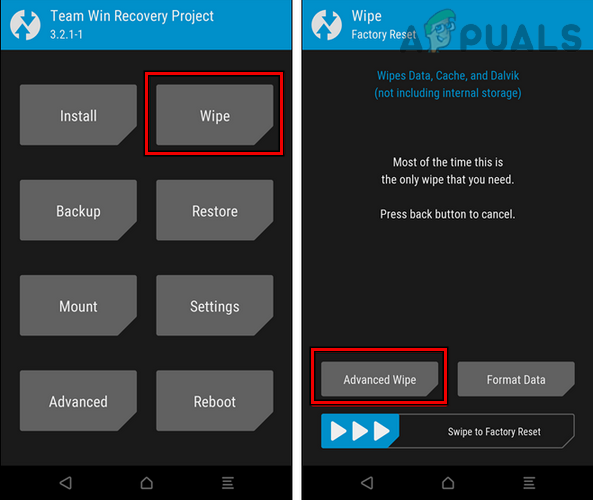
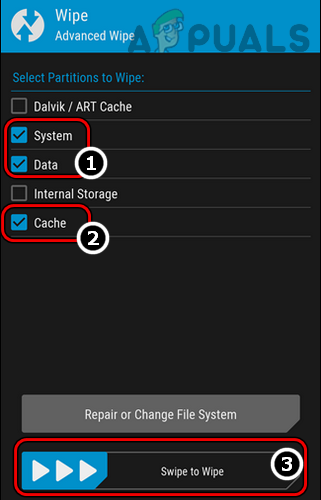
Step 5: Wipe/Reset Partitions on the Phone
Now is the time to wipe the official Android from your phone. To do so: If you are using Lineage OS recovery (not TWRP recovery), then you may execute the following one by one:
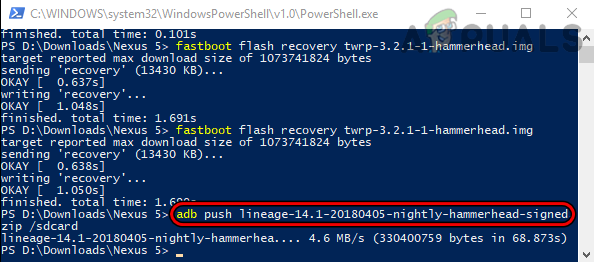
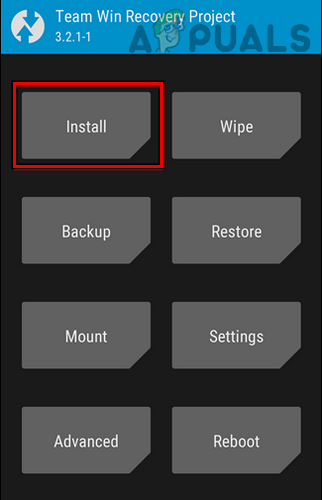
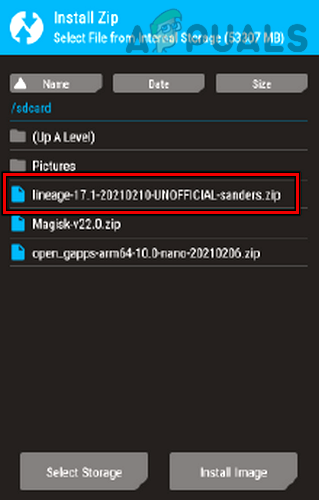
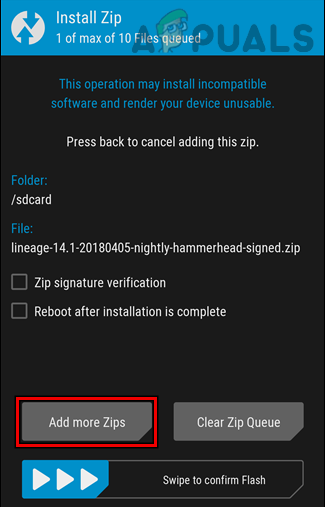
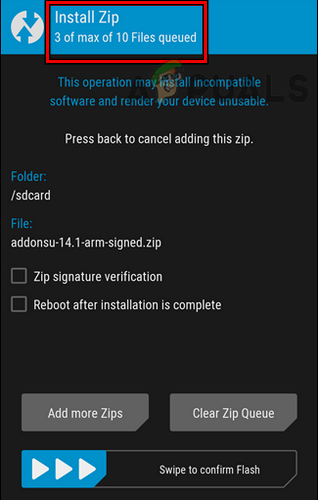
Step 6: Flash Lineage, GAPPS, and SU on the Phone
Now we will perform the main task of installing or flashing Lineage OS on your phone. In the case of non-TWRP recovery, you may (one by one) execute the following in the system’s PowerShell in the ADB folder (do not forget to replace files with the original file names):
Step 7: Boot and Set Up Your Phone
Once the flashing process completes, reboot your phone for the last time and wait till the phone reboots as it can take some time to boot for the first time after flashing Lineage (if it takes more than 15 minutes, then you may force restart the phone). Once done, set up your phone as per your liking, and hurray, you are running Lineage OS on your phone. To enable root access, head to the Developer Options of the Lineage OS and enable it there. If you are not happy with the Lineage OS on your phone, then you can reflash your phone with the stock ROM (the process is generally the same as the above) but you may need to search the Internet to do so. We are hopeful that this article will be helpful for you in the world of flashing custom ROMs but if you have any queries, we will be very happy to help out in the comments section.
What Makes Lineage OS the Best for Android PhonesFIX: Android Phone Showing Unknown As My Phone NumberHow to Build Lineage OS on Windows 10Asus Rog Phone 2 vs Razer Phone 2: Confrontation of Gaming-Centric Titans